
- Today
- Total
| 일 | 월 | 화 | 수 | 목 | 금 | 토 |
|---|---|---|---|---|---|---|
| 1 | 2 | 3 | 4 | 5 | 6 | 7 |
| 8 | 9 | 10 | 11 | 12 | 13 | 14 |
| 15 | 16 | 17 | 18 | 19 | 20 | 21 |
| 22 | 23 | 24 | 25 | 26 | 27 | 28 |
- gdrive
- 셀레니움
- 파이썬
- 알고리즘 강의
- 파이썬3
- 파이썬 강의
- 프로그래밍
- 자료구조
- 파이썬 알고리즘
- 파이썬 입문
- python 중간고사
- 대학시험
- 파이썬 강좌
- 면접 파이썬
- 파이썬활용
- 파이썬 자료구조
- 중간시험
- c언어
- 알고리즘 강좌
- 코딩시험
- Crawling
- 채용문제
- selenium
- 자료구조 강의
- 기말시험
- 알고리즘
- 크롤링
- python data structure
- 코딩문제
- 쉬운 파이썬
반원 블로그
1회차 - 06 componentDidUpdate , ReactNative의 LifeCycle API 본문
1회차 - 06 componentDidUpdate , ReactNative의 LifeCycle API
반원_SemiCircle 2020. 6. 30. 18:21니콜라스 강의를 보면 도중에 App.js에서 export default function App()를 export default class extends React.Component로 바꾼 뒤componentDidMount()란 함수가 갑자기 튀어나온다.
import React from 'react';
import Loading from "./Loading";
import * as Location from 'expo-location'

export default class extends React.Component {
  // 함수 만들기
  geoLocation = async() => {
    const location = await Location.getCurrentPositionAsync(options);
    console.log(location);
  }

  componentDidMount(){
    this.geoLocation();
  }

  render(){ return <Loading/>; }
}
일단 componentDidMount가 뭔지에 대해서 찾아보니 react.js에 대한 내용이 있었다.
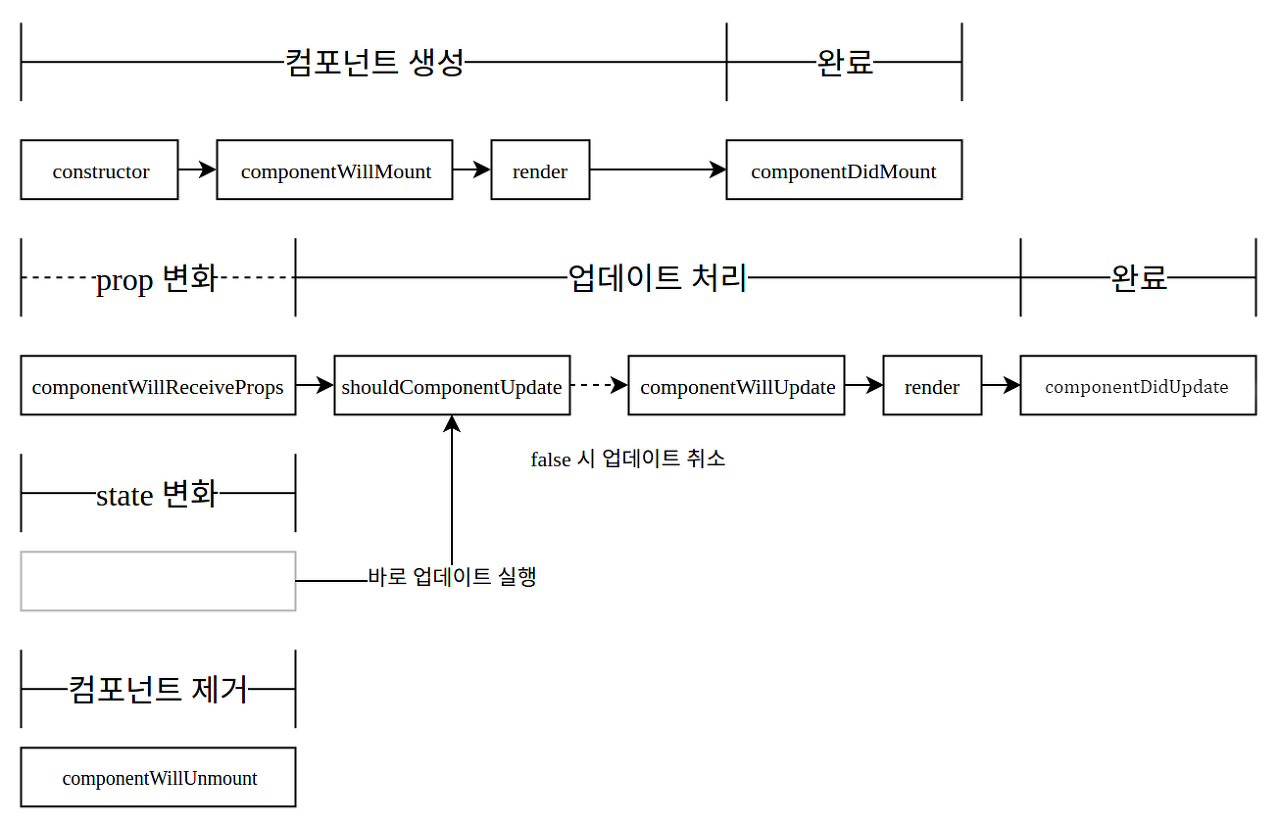
클릭해보니 LifeCycle API 순서에 대한 내용이였다.
- 컴포넌트를 생성 할 때는 constructor -> componentWillMount -> render -> componentDidMount 순으로 진행
- 컴포넌트를 제거 할 때는 componentWillUnmount 메소드만 실행
- 컴포넌트의 prop(속성)이 변경될 때엔 componentWillReceiveProps -> shouldComponentUpdate -> componentWillUpdate-> render -> componentDidUpdate 순으로 진행
라이프 사이클을 제대로 이해하면 코드를 수행할 타이밍을 더 세밀하게 정할 수 있는 것 같다.
그래서 지금까지 작성한 코드를 분석하면?
App.js
import React from 'react';
import {Alert} from 'react-native'
import Loading from "./Loading";
import * as Location from 'expo-location'
import axios from 'axios';

const API_KEY = "api key";

export default class extends React.Component {
    // state
    state = {
        isLoading : true
    };

    // define get openweather api function
    getWeather = async(latitude, longitude) =>{
        const {data} = await axios.get(
            `https://api.openweathermap.org/data/2.5/weather?lat=${latitude}&lon=${longitude}&appid=${API_KEY}`
        );
        console.log(data);
    }

    // 함수 만들기
    geoLocation = async() => {
        try{
            const response = await Location.requestPermissionsAsync();
            const {coords : {latitude, longitude}}  = await Location.getCurrentPositionAsync();
            console.log(latitude, longitude);

            // send weather api call
            this.getWeather(latitude, longitude);

            // 위 작업 전부 처리되면 로딩화면 종료
            this.setState({ isLoading:false });
        } catch(error){
            // 사용자가 허용안하면 위 코드에서 에러가 나고 그럼 여기가 실행
            Alert.alert("Can't find you.", "So sad");
        }
    }

    componentDidMount(){
        this.geoLocation();
    }
    render(){
        const { isLoading } = this.state;
        return isLoading ? <Loading/> : null;
    }
}
현재까지 작성한 app.js 코드는 아래와 같다.
여태 강의를 따라하며 작성한 코드가 기껏해야
- 위도, 경도 가져오는 것
- 날씨 정보 요청하는 것
- 1과 2를 정의한 함수 실행하기
- Loading.js에서 가져온 코드 render하기
인데, 위의 [컴포넌틑 생성] 사이클을 보면 현재 작성된 코드는
4-3-1-2 순으로 실행되고 있다.
또한 render는 요소나 속성이 변경할 때도 실행되는 업데이트 사이클(다르게 말하면 loop)에 들어있으므로,
render(){
        const { isLoading } = this.state;
        return isLoading ? <Loading/> : null;
}
로 작성되있는 것 같다. 한 번만 실행되는 것이라면 const { isLoading } = this.state;로 return isLoading ? <Loading/> : null;를 할 필요가 없지않았을까? 하고 추측해본다.
LifeCycle 메소드
대체로 컴포넌트를 만들거나 초기화 실행을 할 때는 componentDidMount에 작성하는 것으로, 반복할 것은 render 넣는다고 생각해도 될 것 같다.
마치 프로세싱이나 아두이노에서 setup,init -> componentDidMount, render -> loop나 draw 함수에 매칭시키면 되지 않을까 싶다.
아래는 자세하게 메소드를 정리해두도록 하자! 아래를 보면 이 기능은 이 메소드안에서 실행되도록 해야겠다를 알 수 있다.
constructor
- 생성자 메소드로서 컴포넌트가 처음 만들어 질 때 실행됩니다.
- 이 메소드에서 기본 state 를 정할 수 있습니다.
constructor(props){
    super(props);
    console.log("constructor");
}
componentWillMount
- 컴포넌트가 DOM 위에 만들어지기 전에 실행됩니다.
componentWillMount(){
    console.log("componentWillMount");
}
render
- 컴포넌트 렌더링을 담당합니다.
componentDidMount
- 컴포넌트가 만들어지고 첫 렌더링을 다 마친 후 실행되는 메소드.
- 이 안에서 다른 JavaScript 프레임워크를 연동하거나, setTimeout, setInterval 및 AJAX 처리 등을 넣는다.
componentDidMount(){
  console.log("componentDidMount");
}
componentWillReceiveProps
- 컴포넌트가 prop 을 새로 받았을 때 실행.
- prop 에 따라 state 를 업데이트 해야 할 때 사용하는 것이 유용하다.
- 이 안에서 this.setState() 를 해도 추가적으로 렌더링하지 않는다.
componentWillReceiveProps(nextProps){
    console.log("componentWillReceiveProps: " + JSON.stringify(nextProps));
}
shouldComponentUpdate
- prop 혹은 state 가 변경 되었을 때, 리렌더링을 할지 말지 정하는 메소드.
- 아래 예제에선 무조건 true 를 반환 하도록 하였지만, 실제로 사용 할 떄는 필요한 비교를 하고 값을 반환로 해야한다.
- 예:
return nextProps.id !== this.props.id;
- 예:
- JSON.stringify() 를 쓰면 여러 field 를 편하게 비교 할 수 있다.
shouldComponentUpdate(nextProps, nextState){
    console.log("shouldComponentUpdate: " + JSON.stringify(nextProps) + " " + JSON.stringify(nextState));
    return true;
}
componentWillUpdate
- 컴포넌트가 업데이트 되기 전에 실행.
- 이 메소드 안에서는 this.setState() 를 사용 금지 – 무한루프에 빠집니다.
componentWillUpdate(nextProps, nextState){
    console.log("componentWillUpdate: " + JSON.stringify(nextProps) + " " + JSON.stringify(nextState));
}
componentDidUpdate
- 컴포넌트가 리렌더링을 마친 후 실행.
componentDidUpdate(prevProps, prevState){
    console.log("componentDidUpdate: " + JSON.stringify(prevProps) + " " + JSON.stringify(prevState));
}
componentWillUnmount
- 컴포넌트가 DOM 에서 사라진 후 실행되는 메소드.
componentWillUnmount(){
    console.log("componentWillUnmount");
}'2018~ > react native' 카테고리의 다른 글
| 1회차 - 09 react native 날씨 앱 따라 만들기(4) - 디자인 시작 (0) | 2020.07.01 |
|---|---|
| 1회차 - 08 ES6 문법 - Arrow function (0) | 2020.07.01 |
| 1회차 - 07 ES6 문법 - rest operator (0) | 2020.06.30 |
| 1회차 - 05 ES6 문법 - Async, Await (0) | 2020.06.30 |
| [자료 찾기] react native expo로 firebase 사용하기 (0) | 2020.06.30 |
| 1회차 - 04 react native 날씨 앱 따라 만들기(3), 지역 가져오기 (1) | 2020.06.29 |
| 1회차 - 03 react native 날씨 앱 따라 만들기(2), 리액트 네이티브 Nox, BlueStack으로 연동 개발하기 (0) | 2020.06.29 |
| 1회차 - 02 react native 날씨 앱 따라 만들기(1) (0) | 2020.06.29 |